Boost Engineering Agility with Mock Servers
Eliminate network dependencies until the last responsible moment

Most product teams I've worked with are not full-stack. That is, there are backend engineers, and some combination of frontend and mobile engineers. The backend engineers focus on adding capabilities to servers, often exposing these capabilities in the form of new or refined API endpoints. Frontend and mobile engineers are the eventual consumers of these endpoints, revealing the new-found backend capabilities to end users by creating a new, iterative user experience that depends on those endpoints.
Ideally, work is parallelized as much as possible, with any given piece of work materializing as a dependency at the last responsible moment; in this case, the release of new capabilities to customers. To be clear, this "release" is not the same as "deployment". Code can be deployed to production without ever being executed through the use of feature flags.
Here's a simple framework for enabling parallelization when client code (frontend or mobile) depends on server code (API changes):
In a focused backend merge/pull request (PR), define the new API contract in an OpenAPI spec. This PR is meant exclusively (for now) for the full-stack team to agree on the shape of the new endpoint. PR comments provide a record of conversation en route to the ultimate decisions made when defining the contract. If contract tests are a part your CI/CD pipeline, they should fail in the PR at this stage.
When sufficient buy-in is reached among team members, build a mock server based on that contract. Now frontend and mobile engineers have a functional backend to use their work. This is where agility is created.
In parallel, or in sequence:
Frontend and mobile engineers work on their respective client code bases, optionally tucking their new user experiences behind feature flags, and using as their backend the previously built mock server. The need for feature flags depends on the anticipated timing of backend deployment. If backend work is nearing completion at the time client code will be deployed, maybe feature flags are bypassed. Most importantly, the time between code being authored and code being deployed should be minimized to support short-lived featured branches. For releases depending on other changes, this can be facilitated through the use of feature flags. In any case, this step is completed by the deployment of client code.
Backend engineers begin work on the previously open PR. When implementation is complete, contract tests should pass. This step is completed by the deployment of server code.
If client code was deployed before server code above, toggle the client feature flags to
on.
The rest of this article is focused on the enablement of client/server agility: the building of a mock server in step 2 above.
Prerequisite: OpenAPI Specification
If you've done your due diligence in expressing your API's intent with an OpenAPI spec, congratulations - the work to build a mock server will likely require a low level of effort. If not, I've got you covered:
Start here for introducing an API spec
Continue here to begin validating your API spec with contract tests
Finish here to validate your API spec in a CI/CD pipeline
Once you've got an OpenAPI spec that captures at least part of your API, you're ready to build a mock server.
Following Along
All code I present here is hosted on GitHub at christherama/dino-api. There are three ways you can follow along with the implementation I'll discuss:
Clone the git repo and checkout the tag at our starting point:
git checkout tags/v1.0.0 -b build-mock-apiDownload an archive of the project at our starting point here
See the final implementation here
Because I'll be using GitHub Actions to build the mock server, if you want to do the same, you'll need your own repository. You could fork the repo above. However, because special rules apply to GitHub Actions run on forked repositories, I recommend that you create your own GitHub repository, then after cloning the repository referenced above, set the remote URL locally to the one you've created:
git clone git@github.com:christherama/dino-api.git
git remote set-url origin git@github.com:<USERNAME>/<REPO>.git
git push --set-upstream origin main

# If you want to begin from our starting point
git checkout tags/v1.0.0 -b build-mock-api
Create a Mock Server with Prism
There are many tools available for creating mock servers. Here are just a few:
In this article I'll be discussing the use of the last one, Prism. It's dead simple and fast.
The work of publishing a mock server can be grouped into two categories:
Create a Dockerfile to be used for building a custom Docker image with Prism
Build the image from this Dockerfile and push it to the GitHub Container Registry (GHCR)
Create a Prism Dockerfile
For the Dockerfile, we'll start with the stoplight/prism:4 image, copy our OpenAPI spec into the image, and configure the command to start prism using that spec. Let's store this in the project at mock/Dockerfile:
FROM stoplight/prism:4
COPY api/docs/openapi.yaml /config/openapi.yaml
CMD ["mock", "-h", "0.0.0.0", "/config/openapi.yaml"]
Not much to it! Now, on to the GitHub Action to build and publish.
Publish the Mock Server to GHCR
I'm going to focus on augmenting our PR workflow with a job to build the mock server. I'll stick this job just before the running of contract tests, and ensure it runs only if our API image can be built. Note that I won't require contract tests to pass to build this image, because the purpose of this mock server is to give API clients a means to not depend on a working implementation.
Here's the augmented workflow at ./github/workflows/pr.yaml with comments to explain:
name: Pull Request
on: [pull_request]

jobs:
  image-tag: {...}
  build-api-image: {...}
  build-mock-api-server:
    name: Build and Push Mock API Image
    runs-on: ubuntu-22.04
    # Give this job permission to write to GHCR
    permissions:
      contents: read
      packages: write
    needs:
      - image-tag
      - build-api-image
    steps:
      - uses: actions/checkout@v3
      - name: Log in to GHCR
        uses: docker/login-action@v2
        with:
          registry: ghcr.io
          # github.actor is the username of the
          # user that triggered the workflow
          username: ${{ github.actor }}
          # This token is automatically created
          # by GitHub Actions upon executing this workflow
          password: ${{ secrets.GITHUB_TOKEN }}
      - name: Set up Docker Buildx
        uses: docker/setup-buildx-action@v2
      - name: Build and push image
        uses: docker/build-push-action@v3
        with:
          context: .
          # This is where our Dockerfile is stored,
          # relative to the root of the checked out repo
          # (see actions/checkout@v3 step)
          file: mock/Dockerfile
          # Yes, we want to push this to the registry
          # we logged into above
          # (see docker/login-action@v2 step)
          push: true
          # Specify mock-api as the package name in GHCR
          # and the output of the image-tag step above
          # as the tag
          tags: ghcr.io/${{ github.repository }}/mock-api:${{ needs.image-tag.outputs.tag }}
  run-contract-tests: {...}
After committing the above changes, pushing to GitHub, then opening a pull request, we should see the following after navigating to the latest build in the Actions tab of your repository:

In addition, if you go to the root of your repository on GitHub, you'll see two packages - one for the Django app, and one for the mock API:

Navigating to the dino-api/mock-api package, I can see the image built from the above job:
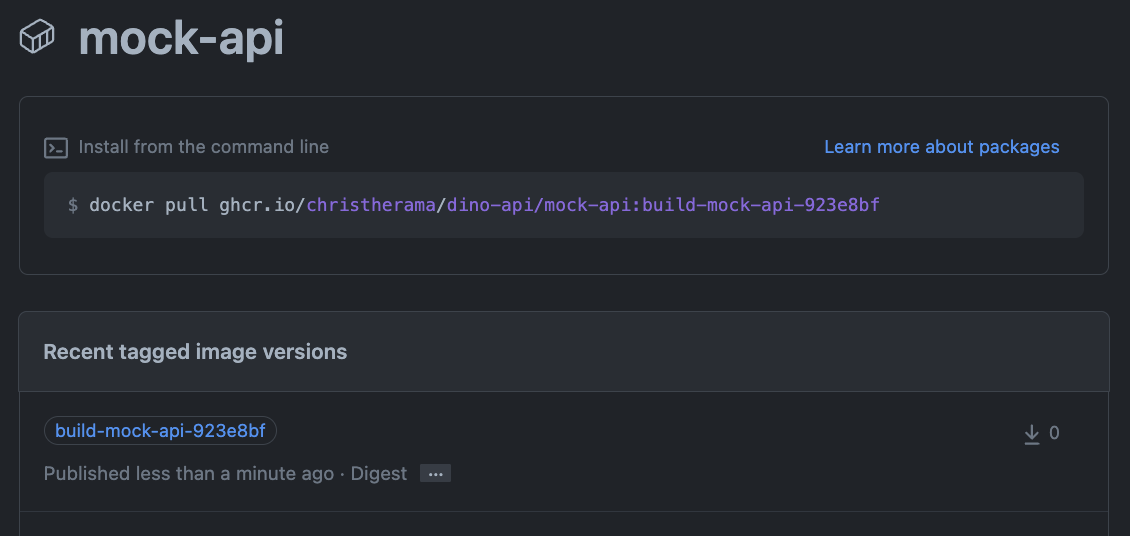
If you are publishing to a private registry, you'll need to log into the ghcr.io registry, first by creating a personal access token (PAT) on GitHub, and then by logging in on your command line with that token. Here is an example:
export GITHUB_PAT=<TOKEN>
echo $GITHUB_PAT | docker login ghcr.io -u <GITHUB-USERNAME> --password-stdin
Whether you're pulling from a public registry, or you've logged in to your private registry, you can now run the mock server locally:
docker run -p 8080:4010 ghcr.io/christherama/dino-api/mock-api:build-mock-api-923e8bf

[docker output truncated]

[10:33:00 PM] › [CLI] …  awaiting  Starting Prism…
[10:33:08 PM] › [CLI] ℹ  info      POST       http://0.0.0.0:4010/api/dinosaurs/
[10:33:08 PM] › [CLI] ℹ  info      GET        http://0.0.0.0:4010/api/dinosaurs/
[10:33:08 PM] › [CLI] ℹ  info      GET        http://0.0.0.0:4010/api/dinosaurs/1/
[10:33:08 PM] › [CLI] ▶  start     Prism is listening on http://0.0.0.0:4010
Then, make a request locally to verify that the mock server works:
curl localhost:8080/api/dinosaurs/1/
{"id":1,"common_name":"T-Rex","scientific_name":"Tyrannosaurus Rex"}
Next Steps
Congratulations: you've just increased opportunities for parallelizing work! Now that you've got a mock API published to a Docker registry, you can distribute that to any engineers whose work depends on the API.
There's a lot more you can do with Prism. This barely scratches the surface. You could generate random responses based on the spec, simply by adding the "-d" arg to the docker image command:
CMD ["mock", "-h", "0.0.0.0", "-d", "/config/openapi.yaml"]
This will generate random strings, integers, booleans, or other types in responses based on your OpenAPI spec.
Check out the Prism docs for more options.